Home     Contact     Projects     Experiments     Circuits     Theory     BLOG     PIC Tutorials     Time for Science     RSS     Terms of services     Privacy policy  
   
 Home      Projects     Experiments     Circuits     Theory     BLOG     PIC Tutorials     Time for Science   


PIC Tutorial - A Pushbutton turning an LED on and off
Before reading this tutorial, make sure you have read the How to use our PIC Tutorials page!


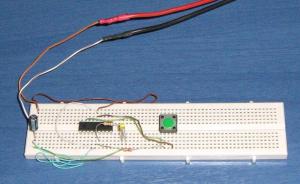
This is a circuit for understanding the ports. The LED connected to the RB0 port of the PIC will simply turn on and off when the user presses or releases the pushbutton connected on the RA0 port of the PIC accordingly.


In Action


The Circuit


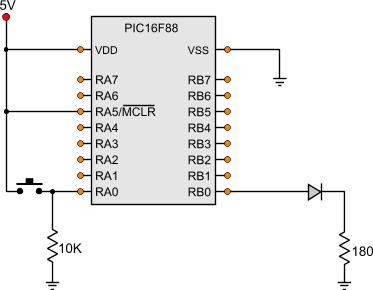
The circuit is very simple. When the pushbutton (NO) is released, the input RA0 is taken LOW through the 10K resistor. When the pushbutton is pressed, the RA0 is taken HIGH through the pushbutton. The rest are taken care from the program of the PIC. Following is the assembly listing. Bellow is the PIC code of this tutorial. You will only find a part of the tutorial that is interesting for our discussion. The rest can be found attached at the end of this page.


The code


; Main Program ------------------------------------------------------------
Start
			bank1				;Go to bank 1
			movlw b'11111111'		;Set the port pin types of the RA
			movwf TRISA			;All RA ports are inputs

			movlw b'11111110'		;Set the port pin types of the RB
			movwf TRISB			;All RB ports are input except RB0 that is output
			bank0				;Go to bank 0
MainLoop
			btfss PORTA,0			;Read RA0 pin
			goto Button_Is_Off		;If RA0 is '0', then goto Button_Is_Off
Button_Is_On
			bsf PORTB,0			;Set RB0 output
			goto MainLoop			;And go back to the Main Loop
Button_Is_Off
			bcf PORTB,0			;Clear RB0 output
			goto MainLoop			;And go back to the Main Loop

At the end of this tutorial, you will find all the files including the above asm file in one zip to download and test it.

It may look a little bit complicated but it is not. Everything up to the comment line 'Main Program' are bits and bytes to initialize and set the PIC into operation. There is also this 'Init_normal.inc' header file included along with the standard 'P16F88.inc'. If you are ne to programming, just do not give them any attention and include them as is. I will explain the code from the 'Main Program' and under.

The first thing to do is to set the RA and RB pin port types. I start with the RA port setupr. To access the TRISA register, i need to change to bank 1. Then i load the byte '11111111' in the TRISA register. With this way, i make all the RA pins inputs. Remember that i need one input for the pushbutton. If you look in the schematic, this input shall be the RA0 pin for me.

Then i declare the RB port pin types. For this, i load the byte '00000000' to the TRISB register. This way, i declare all RB port pins as outputs. I could have load the '11111110' as well, because i need only the RB0 pin to be an output.

When bith port pin types are declared, i switch back to bank 0, the place where the most commonly used registers are located.

Next, it is time for the conditional loop. I check the RA0 state. The btfss PORTA,0 does this work. If the button is NOT pressed, then the RA0 will be zero. If so, then the command right after the btfss PORTA,0 shall be executed. This command is a goto command and shall send the program flow to the Button_Is_Off label. Under this label, there is a bcf PORTB,0 command that will simply clear the RB0 output and the LED shall be turned off. The next command (goto MainLoop) will send the program flow back to the MainLoop label and the program will re-check the RA0 again

If the button is pressed, then the RA0 input shall be '1'. When the program flow reaches the btfss PORTA,0 under the MainLoop label, then the very next command shall be skipped. This means that the program flow shall NOT jump to the label 'Button_Is_Off'. Instead, the command 'bsf PORTB,0' shall be executed. This command will set the RB0 output and the LED will light. The next command (goto MainLoop) will send the program flow back to the MainLoop label and the program will re-check the RA0 and so on and so on...

The above described routine shall loop infinitely.


The project Files

Following are the files for this project:

 PIC tutorial - Lighting an LED with a pushbutton


Previous page ---- Next page


Go back to the book contents

Go to the discussion forum of this book


Comments

  Name

  Email (shall not be published)

  Website

Notify me of new posts via email


Write your comments below:
BEFORE you post a comment:You are welcome to comment for corrections and suggestions on this page. But if you have questions please use the forum instead to post it. Thank you.


  • At 20 May 2013, 3:04:57 user priyanka wrote:   [reply @ priyanka]
    • thanks dear.
      my PIC is 16f877a,then how should this code need to change.?


  • At 23 December 2012, 12:50:27 user steve wrote:   [reply @ steve]
    • hey all, please i need a help!!
      i need an assembly code for 8088 and EPROM!!
      the code about i have 8 switches and 8 output leds, so when i close switch1 led1 light, switch2 close then light2 light.....and so on!!

      Regards


  • At 13 June 2012, 10:22:19 user kamran alam wrote:   [reply @ kamran alam]
    • the way u makes us learn about the pic is fantastic. i had refered lots of theory for pic but this one is just outstanding.....
      thanks a lot for your concrete support dude!

      may god bless u.


  • At 2 January 2012, 17:48:52 user Kammenos wrote:   [reply @ Kammenos]
    • @alex so you need a toggle switch.
      ; PORTA,1 has the button input
      ; PORTA,2 is the output
      BCF porta,2
      main_loop
      btfss porta,1
      goto main_loop ;if not pressed goto back
      ;otherwise, wait to be released
      call wait100msec
      btfsc porta,1
      goto $-1
      call wait100msec
      ;And if released, toggle the output
      btfss porta,2
      goto $+3
      bcf porta,2
      goto Main_Loop
      bsf porta,2
      goto Main_Loop

      For more info please use the forum. Long posts are problem in comments.


  • At 29 December 2011, 9:26:31 user alex wrote:   [reply @ alex]
    • hi i have a question about "PIC tutorial - Lighting an LED with a pushbutton", i like this circuit but i would like when i push the button the led turns on and stays on without keep pushing the button. and when i push it again the led to turns off. can we do this with changing the program. is possible to help me to do this
      thanks a lot


  • At 31 May 2011, 10:15:48 user Kammenos wrote:   [reply @ Kammenos]
    • @Steve hi Steve. If you download the project files, you will find inside an inc file named P16F88.INC. In this file, i have the definitions that i use. Yo must include it in your project as well (#inlude P16F88.INC). if you plan to use a different PIC, then you must get this file from MPLAB folders (search for 12f683 in MPLAB folder). Then, manually copy/paste the zero, carry and dcarry definitions from my file (bottom of file)


  • At 31 May 2011, 8:12:48 user Steve wrote:   [reply @ Steve]
    • Hi
      In the MSECDELAYS4MHZ.INC file it says at one stage btfss Zero but Zero doesn't seem to be defined? Is this correct?

      I am porting this to a pic12f683 so that may be the issue?

      Thanks
      Steve


  • At 30 March 2011, 21:11:08 user Kammenos wrote:   [reply @ Kammenos]
    • @msndk you can read the PIC with the programmer actually...


  • At 30 March 2011, 21:05:32 user msndk wrote:   [reply @ msndk]
    • Is there any way to check whether the PIC has indeed been programmed without building the circuit and testing it there?


  • At 25 January 2011, 7:47:54 user Kammenos wrote:   [reply @ Kammenos]
    • Ravi, do you have a script blocker or something? Because i tested the files and downloads normally. When you click "PIC tutorial - Lighting an LED with a pushbutton", the download should start.


  • At 24 January 2011, 11:24:46 user Ravi wrote:   [reply @ Ravi]
    • Unable to download the files for this project,
      clicking "PIC tutorial - Lighting an LED with a pushbutton" doesnt yield any result...????


  • At 6 September 2010, 7:05:39 user yadav wrote:   [reply @ yadav]
    • an excellent job


    No part of this publication may be reproduced, stored in a retrieval system or transmitted in any form or by any means, electronic, mechanical, photocopying, recording, scanning or otherwise without the prior written permission of the author.

    Read the Disclaimer


    All trademarks used are properties of their respective owners.
    Copyright © 2007-2009 Lazaridis Giorgos.
    All rights reserved.


     HOT in heaven!


  • Disclaimer
  • Book Contents
  • Discussion forum

  • Basics
  • What will you need
  • Choosing the right PIC
  • The MPLAB
  • Getting familiar with the MPLAB environment
  • Creating a new project
  • Open and close projects
  • Creating new files and including them in the project
  • Your very first assembly program
  • Compile a program and transfer to the PIC
  • Section 1: Beginner's theory
  • Memory Organization
  • The Data Memory Organization
  • The Program Memory Organization
  • The instructions
  • General knowledge about instructions
  • Value Loading Instructions
  • Program Flow Instructions
  • Mathematic Instructions
  • Logic Function Instructions
  • Bit Orientated Instructions
  • Byte Orientated Instructions
  • Miscellaneous Instructions
  • The Basic Special Function Registers
  • The Status Register
  • The Option_Reg Register
  • The TRIS and PORT registers
  • Beginner's PIC Tutorials
  • How to use our PIC Tutorials
  • A Pushbutton turning an LED on and off
  • A Simple LED Flasher
  • Interfacing Multiple Switches - The internal Pull-Up resistors
  • An LED Sequencer
  • Interface a Single 7seg Digit
  • Interface Multiple 7seg Digits
  • A 3-digits Decimal Counter
  • A Clever Button
  • Section 2: Intermediate theory
  • Instruction Cycle Duration and Calculated Delays
  • The Timer Modules - Timer0
  • The Timer Modules - Timer1
  • The Timer Modules-Timer2


  • NEW in heaven!


    New Theory: AC electric motor working principle


     Contact     Forum     Projects     Experiments     Circuits     Theory     BLOG     PIC Tutorials     Time for Science     RSS   

    Site design: Giorgos Lazaridis
    © Copyright 2008
    Please read the Terms of services and the Privacy policy