Home     Contact     Projects     Experiments     Circuits     Theory     BLOG     PIC Tutorials     Time for Science     RSS     Terms of services     Privacy policy  
   
 Home      Projects     Experiments     Circuits     Theory     BLOG     PIC Tutorials     Time for Science   

7 August 2010
Author: Giorgos Lazaridis
Men Of War Game Console


Worklog - Controller Designs (August 7 2010)

This is the very first design of the controller. I call it the "cooking glove":
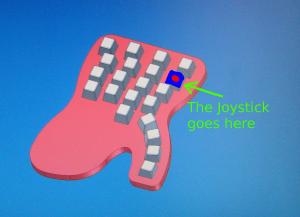


There are 4 rows with 4 buttons each (except the 2nd wor that has the joystick). All these buttons are pressed with the 4 fingers of the left hand, and the joystick is controlled with the pointing finger. The row with the joystick is the "main row" that the fingers will lay all the time. For to click the other buttons, the fingers must move up or down, similar like the "blind typing" system on the keyboard.

There are also 4 more buttons on the right side. These buttons are controlled with the thumb, so i call them "thumb buttons". And finally, there is one more button in the middle of nowhere, that will simulate the "esc" button and will be pressed with the pointing finger.


Free courses for blind typing

Ok let's be realistic. The above design is too complicated. I mean, ok, i do have all the shortcuts, but frankly, i do not know if i will be able to use them. I will need to practice A LOT for my fingers to learn the positions. So i decided to lighten up the design. This would result in reducing the shortcuts... Yuck! I want as more shortcuts as possible!


And that is how the Shift was invented!

Imagine the scene: Two top-scientist are discussing in the R&D of IBM, about how many keys should a keyboard -the very first keyboard ever- have...

    Dr. Papas: "We need to have the 10 numbers, ten function keys, the 4 arithmetic symbols, and 28 more symbols.
    Dr. Moose: "What? And what about the 26 letters?"
    Dr. Papas: "26 small and 26 capital...And... also 4 arrow keys for th 4 directions, and some special keys like home, end, page up. And a numeric keypad... I think we need about 210 keys"...

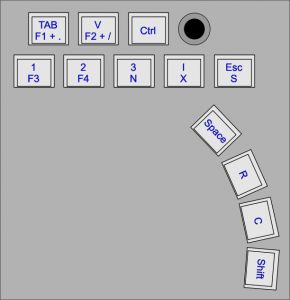
And that is how possible the "Shift" key was invented, which is exactly how it was invented in my case... I will turn the bottom right thumb-button into a shift, giving double functionality to all other buttons, except of course the other 3 thumb-buttons. I will reduce the button rows in 2, and i will add another button to the 2nd row. To further zip the buttons, i will merge the F1 with the . together, and the F2 with the / key. That is why the .(Change ammo (HE-AP)) and the / (Next machine gun) are effective only when controlling Tanks, while F1 (select frag grenade) and F2 (select AT grenade) are effective only when controlling infantry. This means that if i press the F1+. button, the controller will send both the F1 and the dot (.), but only the shortcut that has an effect will be taken into account by the game. So here is the layout. There are 2 lines in each key. The top line is the shifted:


Getting the keys

If you want to have keyboard-feel keys, then use keyboard keys... I always keep my old (and broken) keyboards for their controllers. Yet, older keyboards used to have pushbuttons to their keys (and that is the reason why keyboards used to cost a huge load of money). Luckily, i had such a keyboard in my museum:


This is my keyboard to hack (the cover is already missing) Using my homemade soldering station and a solder pump i removed one by one the keys And here we are!!!


As for the joystick, i got it from E-Bay. It is supposed to be an analog joystick, but the trimmers that it has are worst than junk. The seller got a negative feedback from me, i am sorry. Also, the pushbutton action that the joystick has needs too much force. That is why i do not use the joystick pushbutton action and i removed the button to reduce space. Then i began soldering the keys into a pre-drilled PCB. I had also print-outs with the approximate position for the keys:


I used printout masks to find the spacing for the keys I used hot-melt glue to keep the buttons in position The first rows are almost ready. The 5th key on the 2nd row is missing.
I used another printout for the thumb-buttons I had to make the PCB holes bigger and turn the buttons a bit to have them aligned in arrow Here we are! Yet the 5th button from the 2nd is missing, because i added later.


As for the buttons, i had to remove the letters and symbols:


A 180 sandpaper is just fine I used a pen to have the sandpaper round And i used alcohol to clean the buttons Perfect!


Comments

  Name

  Email (shall not be published)

  Website

Notify me of new posts via email


Write your comments below:
BEFORE you post a comment:You are welcome to comment for corrections and suggestions on this page. But if you have questions please use the forum instead to post it. Thank you.


  • At 9 October 2011, 4:46:45 user Chris wrote:   [reply @ Chris]
    • This is such a great project. I am truly inspired. Very cool. Love the site too. Please never stop showing us your great projects.


  • At 18 June 2011, 14:06:48 user Stefan wrote:   [reply @ Stefan]
    • Hi there,can you make a code for PIC16F876A or simular of it,because I don't have that microcontroler used in the project. :(


  • At 14 December 2010, 9:16:38 user Kammenos wrote:   [reply @ Kammenos]
    • Well, "lol", as i always, say "Use all your abilities to win". After all, you can get yourself a customizable controller from the market. And then, i hope i meet you in the battlefield... preferably at the opposite team... ;) ;) ;)

      PS: This is not cheating. I don't use a bot to do something that i can't, faster or more accurate. I mean, hey, be wise and gather all the shortcuts that you need close. You can do that. You can customize your shortcuts... You can use the shift key, the control, double clicks...Everything. Is this so hard to do? Or do you miss the LED effect that i have???


  • At 14 December 2010, 8:28:25 user lol wrote:   [reply @ lol]
    • man you are such a nerd, go, get a wife children and a life.
      with this frankenstein like thing you have clearly an unfair advantage
      you super nerd hardwarecheater.


  • At 3 December 2010, 4:03:43 user Don wrote:   [reply @ Don]
    • Oops! Just realized I was reading the comments in backwards chronology! My bad! Sorry, nevermind my last comment!


  • At 3 December 2010, 4:00:56 user Don wrote:   [reply @ Don]
    • Just ran across your site! Thank you! Very informative! A note to Marc Leonhart (since nobody answered him; AND although I haven't studied all the specifics): I believe an input device like this could do anything you would like it to do. It is custom made. I'm sure it could be modified to any purpose!


  • At 17 November 2010, 5:20:29 user Kammenos wrote:   [reply @ Kammenos]
    • brannen. read the worklog. its a construction from a scratch.


  • At 17 November 2010, 2:22:18 user brannen wrote:   [reply @ brannen]
    • i think you used a xbox 360 controller and some hot keys from a key bord


  • At 29 October 2010, 4:52:57 user Antonio wrote:   [reply @ Antonio]
    • respect!!!


  • At 26 October 2010, 19:53:48 user Kammenos wrote:   [reply @ Kammenos]
    • Of course it can. But there are in the market remarkable shortcut consoles for this. You may be interested in this project, either if you want to DIY and for you the trip is more important than the destination, or because you want to do something that the market consoles wont do. In my case, i fit in both cases. The joystick for example is not just a normal arrow key replacement. Does much more that a normal game console cannot be programmed to do. But most of all, i just wanted to do it...


  • At 26 October 2010, 18:50:17 user Marc Leonhardt wrote:   [reply @ Marc Leonhardt]
    • So can a project like this be fitted towards Photoshop and Sai, since I draw with the right I want shortcut keys for the left. But need more button option.


    delicious
    digg
    reddit this Reddit this
    Faves


     HOT in heaven!


    NEW in heaven!


    New Theory: AC electric motor working principle


     Contact     Forum     Projects     Experiments     Circuits     Theory     BLOG     PIC Tutorials     Time for Science     RSS   

    Site design: Giorgos Lazaridis
    © Copyright 2008
    Please read the Terms of services and the Privacy policy