|
 Home Home
 Projects Projects
 Experiments Experiments
 Circuits Circuits
 Theory Theory
 BLOG BLOG
 PIC Tutorials PIC Tutorials
 Time for Science Time for Science
|
| ||
|
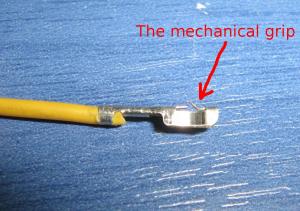
19 February 2010 Author: Giorgos Lazaridis Reuse and-or extend the Molex connectorsIn many occasions, i had the need to draw power from the PC power supply, either because i made a system built-in a computer case, or because i used a PC power supply to provide power to another device. Some other times, i needed to extend a PC connector, especially in PC case modding applications. For my current PC configuration, i had for example to extend the 24 pin power supply. So, i had to find an easy and repeatable way to reuse and/or extend the Molex connectors. This is how i do it. First things first - Extract the pins out of the housing This is the "hardest" part compared to the whole procedure, but actually, nothing will be hard after all. There are special pin extractors for the molex headers that you can get for as low as $8.00 each (+PP), but unless you are a professional and you extract tens or hundreds of pins daily, i really discourage you to buy them. All you need is to know the mechanical grips where and how to reach them. So, i will start from the easiest connectors. Extracting the pins from floppy disc type Molex connectors and fan connectors Or in general, i could name this section "extract the pins from small molex connectors. The small molex connectors have the mechanical grip of the pins in a very obvious position. This is how a pin looks like when extracted: 
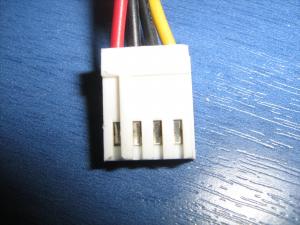
And this is how it looks like then is is still in the housing: 
To extract it, you need to use a small flat screwdriver, about 2mm wide. You will use the screwdriver to push slightly down the mechanical grip, and in the meanwhile you push the pin out of the housing. Try not to cannibalize the grip of the pin, as you will need it later. The force required to push the grip down is significantly less than the force to push the pin out of the housing. With a little practice, you will get the feeling. When the pin is extracted, the grip probably needs to be restored. I use a sharp blade to do this. First, i pull the grip out with the edge of the blade, and then i straighten it with my finger. Please try to save yourself from injuries.
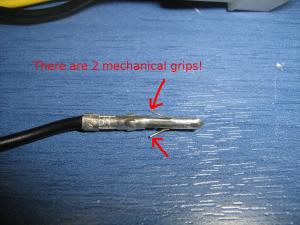
Extracting the pins from 4-pin power supply Molex connectors I suspect that this kind of connector is the most popular that goes inside a chop-shop. Frankly, the extraction process is rather easy. The same 2mm flat screw driver will be used for the job. But now, the 2mm is a barrier. You cannot use bigger screwdriver. Actually, i would suggest an 1.5mm screwdriver instead. The first thing to do is to discover the mechanical grips. Now, there are two grips that they must be both pushed away. If you look inside this connector from the pin side, you will find the grips laying there in peace. This is how a pin looks like when extracted: 
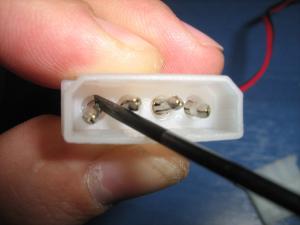
And this is how it looks like inside the housing. 
As you can see, the small screwdriver can easily slip inside and push the grips away from the plastic. When both grips are pushed away, you can simply pull the cable out. As before, the grips must be restored. Use the same technique to restore them, use the same caution (or more) to avoid injuries. Extracting the pins from ATX 20-24 pins power supply Molex connectors This is one level harder as before. Before i discover the trick, i thought that it was 3 or 4 levels above. Your life will be easier if you provide yourself a really small screwdriver. I find the 1mm flat screwdriver to be just the tool for the job. It is quite small to sneak inside and it will not damage the plastic housing or the pin itself. Like before, first you need to discover the grips. There are two grips as well. If the housing is made of semi-transparent molex, the pins can be seen through the plastic, otherwise you may use a magnifying glass and a light to see inside. When you discover the grips, push inside the screwdriver. Do it for both sides. You do not need to do any other move like turning the screwdriver. Just push it straight forward deep inside. Make sure that it is not inside the pin (if it is a female pin), but it is pushed aside, between the pin and the plastic housing. When you have finished the above step, the grips are supposed to be pushed away. Then you just pull the cable out. Yes, the pins will need to have their grips restored as well. Use the same knife and the same caution. With a little practice, you will find this procedure easy. Just get a small 1mm screwdriver. Other connectors? Yes, there are other types of molex connectors, but they use one of the 3 types of gripping more or less. If you come across another type of pin gripping, please let me know to enrich this article. The easy part - Reuse the pins If you have successfully extracted all the pins from the connector, then the hard part is over. Now, you only need to remove the old cable and put your new solder to the pin. There is no particular reason to explain each pin-type separately, as they all use the same way to grip the cable. The cable grippingIf you look into a brand new molex pin, then you will see that there are actually two different grips for the cable. The first one is the shield grip. This grip must grip the wire from the shield, for increased mechanical strength when some vandals pull the molex connectors out from the cables. The second grip is the wire-grip. This grip will perform the galvanic connection between the cable and the pin. When a pin is properly griping a cable, then the wire-grip is rather difficult to open. If you are a maniac, you can open it of course. I strongly do not suggest to do so. The shield-grip is easy to open though. Use a sharp knife to open it. This is a rather dangerous operation. Therefore, i would suggest -if possible- use protective gloves. You can open the grips without having your fingers under the blade. Just practice, its all a matter of angle. When the shield grip is open, cut the wire as close as possible to the wire grip. We are not going to reuse the wire grip. To do so, i bend the cable and move it left and right until it is cut. the new wire will be soldered above the wire-grip and above the old wire. Make sure that when the wire is soldered, it's plastic shield must be between the shield-grips. Finally, with a pair of pliers, grip the shield of the wire with the shield-grips.
Relative pages Comments
|
|
 Contact Contact
 Forum Forum
 Projects Projects
 Experiments Experiments
 Circuits Circuits
 Theory Theory
 BLOG BLOG
 PIC Tutorials PIC Tutorials
 Time for Science Time for Science
 RSS RSS
Site design: Giorgos Lazaridis © Copyright 2008 Please read the Terms of services and the Privacy policy |