|
 Home Home
 Projects Projects
 Experiments Experiments
 Circuits Circuits
 Theory Theory
 BLOG BLOG
 PIC Tutorials PIC Tutorials
 Time for Science Time for Science
|
| ||
|
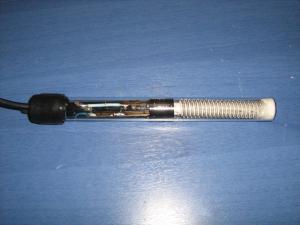
22 February 2010 Author: Giorgos Lazaridis Removing the built-in thermostat of an aquarium heaterI just got a 100 Watts submersible aquarium heater from ebay! No, i don't have a fish aquarium in my house, nor any other living creature larger than bacteria or other microorganisms. The reason that i bid on this item is because i will use it for my homemade PCB etch bath! The heater was ALMOST perfect.... ... except of the built-in thermostat. This thermostat changed my plans. To avoid an aquarium fish-soup, most submersible heaters have this thermostat that will keep the water in a reasonable temperature, depending on the kind of fish in the tank. Unfortunately, fishes cannot live in a 45°C hot water. This heater had a maximum temperature of 32°C, not ideal for etching solutions such as the FeCl3, that has max power at 40 to 45°C. I could only see one solution: Remove the built-in thermostat. That would not be easy though, as the thermostat is inside the sealed and fragile glass housing. Not impossible though. First of all, i removed the easiest part, the plastic cover. The sealing material was revealed. It is a piece made of rubber, about 1 cm long, that seals the glass tube. The glass housing is like the ones used in chemical labs for tests, but it is very thin. The hardest part was to remove this sealing. It took me quite a long time to do it. I used a small screw driver and some olive oil. I was forcing the screw driver between the sealing and the tube, always pushing to the rubber so that i was not stressing the glass. Extra careful needed here as the glass is ridiculously thin. When the screwdriver was in, i poured some oil. I did this many times, while slowly i was pulling the rubber outside. It was not easy at all, but finally i got it out without damaging the glass. When i pulled the guts out of the heater, the thermostat was revealed and was ready to be operated. Short-circuiting the thermostat And what is this thermostat made of? Well, you guessed right! It is just a bimetallic strip. The temperature can be set by changing the tension of the strip with a screw. Another screw was holding all that together. That was my primary target. With no further ado, i removed the screw, and the damned thermostat was riped off. With a piece of wire, i restored the galvanic connection from the cable to the resistor, and now the heater will be on as long as there is power, no matter of the temperature! Putting it back together I thought that leaving the oil inside the tube would be a bad idea. Therefore, i cleaned it and i did not use any oil during the mounting. It was not very hard though. I just pushed the rubber inside slowly, 1-2 millimeters every time, in a cross-pattern. Then i placed the plastic cap back, and this is the result: 
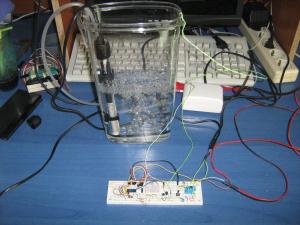
And now what? It will burn uncontrollable? Of course not! I don't want to make tea nor coffee. For this reason, i have already prepare a controlling circuit. Take a look at this thermometer and thermostat circuit. It will keep the temperature at 40°C all the time. When it falls bellow 38 degrees the heater will be activated, and when it climbs above 41 degrees it will stop heating. Here is this circuit controlling this heater: 
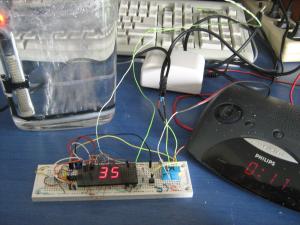
The temperature of 1.5lt water, was raised from 21 to 35 degrees within 11 minutes time! 
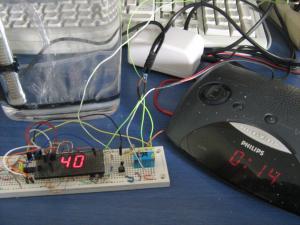
The bath was ready to process the PCBs within 14 minutes! 100 watts heater is -according to the test- a good number 
The bubbles comes from the air pump that i got also from ebay. Within a few days, i will start the "Homemade Etch Bath" project. Do not miss. Comments
|
|
 Contact Contact
 Forum Forum
 Projects Projects
 Experiments Experiments
 Circuits Circuits
 Theory Theory
 BLOG BLOG
 PIC Tutorials PIC Tutorials
 Time for Science Time for Science
 RSS RSS
Site design: Giorgos Lazaridis © Copyright 2008 Please read the Terms of services and the Privacy policy |